


Kimono Bathroom Tips: Use the Toilet Without Ruining Your Outfit
When wearing a kimono, you might wonder how to use the restroom, right? In this article, we will explain how to use the restroom while wearing a kimono, which is a common question from customers who rent kimonos.
※ This article is supervised by the Marketing Team of TripFarm Co., Ltd., which operates Kyoto Kimono Rental RikaWafuku.
Click here for Kyoto Kimono Rental Plans & Price List
Worried About Kimono and Restrooms?
Using the Restroom in a Kimono Is Easy with Some Tips
Even when renting a kimono, one of the most frequently asked questions is “how to use the restroom.”
It’s natural not to know what to do, especially if you’re not used to wearing one.
In fact, some people may have had the bitter experience of going to the restroom and having their kimono come undone.
This time, we will introduce the “restroom method” that you may be curious about but hesitate to ask about.
Even if you are worried about going to the restroom and are hesitant to rent a kimono, please learn these tips and enjoy wearing a kimono ♪
Points for a Worry-Free Restroom Experience in a Kimono
Kimono, which you may not be accustomed to wearing, can be challenging, especially because they have more volume in the front and back than Western clothing. Therefore, we will introduce some points to consider when choosing a restroom.
Of course, it’s not necessary for all these points to be met, but having the following points will make using the restroom smoother, so it’s worth remembering!
◇ Western-style toilet:
Especially for modern people, who are unfamiliar with Japanese-style toilets, Western-style toilets are safer because kimono sleeves won’t touch the floor.
◇ Private stall with ample space:
Particularly for women, due to the volume of the obi (sash), it’s preferable to have enough space to prevent the kimono from touching the walls and getting dirty.
◇ Cleanliness:
Kimono can accidentally get dirty even with the utmost care, so minimizing the risk is essential.
◇ Large mirror (preferably full-length):
After using the restroom, a large mirror is very helpful for checking if the kimono is still in place.
◇ Avoid visiting right after cleaning:
After cleaning, the floor and walls may be wet, increasing the risk of dirt when the kimono comes into contact with them.
In many tourist destinations or unfamiliar places, restrooms with these conditions are often available in major tourist facilities.
Also, if you’re in a pinch, you can ask for permission to use the restroom at public facilities or hotels.
The Importance of Undergarments
To reduce restroom-related anxiety, what’s important is actually your undergarments.
It is recommended to wear low-rise undergarments with a shallow crotch.
Why? Because the strings of the kimono and obi are securely tied around the waist, so if your undergarments cover your abdomen, you will need to pull them out from under the obi every time you use the restroom.
When putting them back in place, the excess fabric around the waist can lead to disarray in the kimono.
Even if you don’t normally wear them, it’s a good idea to have a pair of low-rise undergarments ready for use with kimono.
Click here for Kyoto Kimono Rental Plans & Price List
How to Use the Restroom Without Messing Up Your Kimono
Go to the Restroom Frequently
This is the most important step.
When entering the restroom in a kimono, it takes more time compared to Western clothing, so if you rush at the last minute, you might end up in a difficult situation.
Especially during sightseeing, restrooms are not always conveniently available, so when you find a “user-friendly restroom” as mentioned above, use it promptly. This way, you can use the restroom without rush, without disarray, and with peace of mind.
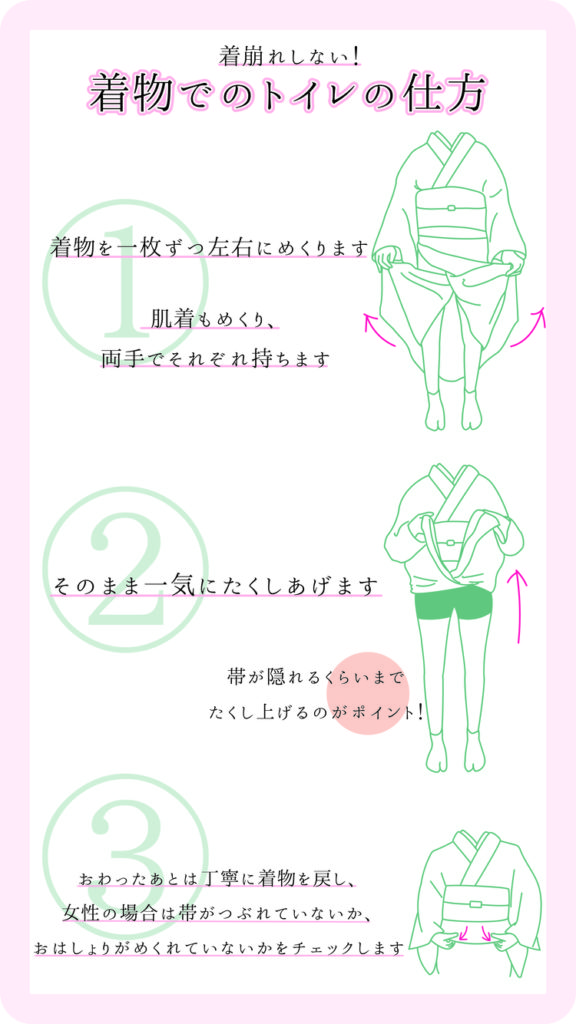
Handling the Kimono
Now, let’s go through the actual steps when entering the restroom:
① Tuck the hem into the obi (it’s recommended to do this on each side under the arms) to prevent it from hanging loosely.
② Starting from the outermost layer, slowly flip up the layers of the kimono one by one, dividing them into left and right.
③ Gently fold the kimono upwards towards the waist, one layer at a time. Be sure not to pull the kimono during this process, as it can cause disarray.
④ While firmly holding the kimono in place, lower your undergarments and use the restroom. Be cautious not to sit deeply on the toilet seat, as it can cause the obi to come undone.
⑤ Reverse the process when lowering the kimono, one layer at a time.
Useful Items to Have
◇ Japanese-style clips:
These are often used during kimono dressing. There are wide clips specifically designed for Japanese attire. Having these clips is very convenient, especially when entering the restroom. You can use them to secure the sleeves or kimono, reducing the chances of accidentally letting them touch the floor.
◇ Waist cords:
Similar to Japanese-style clips, waist cords are useful for securing sleeves or kimono. Some people find waist cords more convenient than clips because they are lighter and less bulky.
Don’t Overlook These Post-Restroom Checkpoints
Carefully Adjust the “Hem”
Even if you think you’ve done it carefully, in the dimly lit restroom, it’s challenging to objectively evaluate. Use a large mirror to check. If you find that the waist area is sagging or the hem is uneven, it’s better to correct it a bit, preferably within the restroom. Avoid pulling forcefully; instead, calmly make the adjustments, and most of the time, it will look tidy again.
Check the “Collar” in Front of the Mirror
By lifting the hem, the obi may ride up, causing the upper body to become loose. When you see a “Y” shape at the collar that appears loose, readjust it.
① Insert your left hand through the opening around your left armpit (called “miyatsuguchi”) and lightly pull the right side of the kimono to the left, straightening the collar.
② With your left hand, secure the left side of the collar in the desired position. Then, with your right hand, gently pull the end of the collar’s extension in line with the collar’s edge.
This will give you a sharp collar. Adjust it while looking in the mirror.
The Easily Forgotten “Obi”
One thing you should never forget is to check which side the obi is tied on.
Depending on how it’s tied, when you lift the kimono, the obi may also rise. Since the obi is made of stiffer material compared to the kimono, unless you firmly lower it by hand, it may remain disheveled throughout the day.
You can ask a friend or simply check it in the mirror. Don’t forget to do this.
★Guides and tips for enjoying Kyoto in a kimono
Kimono Rental in Kyoto & Asakusa: 5 Common Mistakes to Avoid on the Same Day
How to walk without ruining your kimono when renting it in Kyoto
★Check out these articles for your Kyoto trip!
Kyoto Kimono Rental for Couples – Explore the City in Traditional Style!
We recommend renting a kimono in Kyoto and traveling alone! Make wonderful memories!
10 sightseeing spots where you should rent a kimono during New Year’s in Kyoto
Where is the best reservation area for kimono rental in Kyoto?
Author of this article
Kyoto Kimono Rental Rika Wafuku operates four kimono rental shops in Kyoto city, including locations in Arashiyama, Gion, Kiyomizu Temple, and in front of Kyoto Station. In 2023, they served over 230,000 customers in the Kyoto area!
They offer affordable plans, with a kimono dressing plan starting from 3,500 yen, and a hair setting plan from 5,500 yen.
Close to popular tourist spots such as Togetsukyo Bridge, Kiyomizu Temple, Yasaka Koshindo, and Yasaka Shrine!
Kyoto Kimono Rental Rika Wafuku
Kimono Rental Rika Wafuku Gion Store
Kimono Rental Rika Wafuku Arashiyama Store
Kimono Rental Rika Wafuku Kiyomizu Temple Store
Kimono Rental Rika Wafuku Kyoto Station Front Store